
Transforming our Formal Dining Room into a Home Office
Our home had a room right off the entryway that connected to our kitchen and was intended to be a formal dining room. We aren’t formal dining room kind of people and I knew when we bought this home 3 years ago that I could better utilize the space. Plus, we have a large dining room area off the back of our kitchen so a formal one was just a waste. In this blog post I am sharing everything we did to transform our formal dining room into the home office of my dreams!
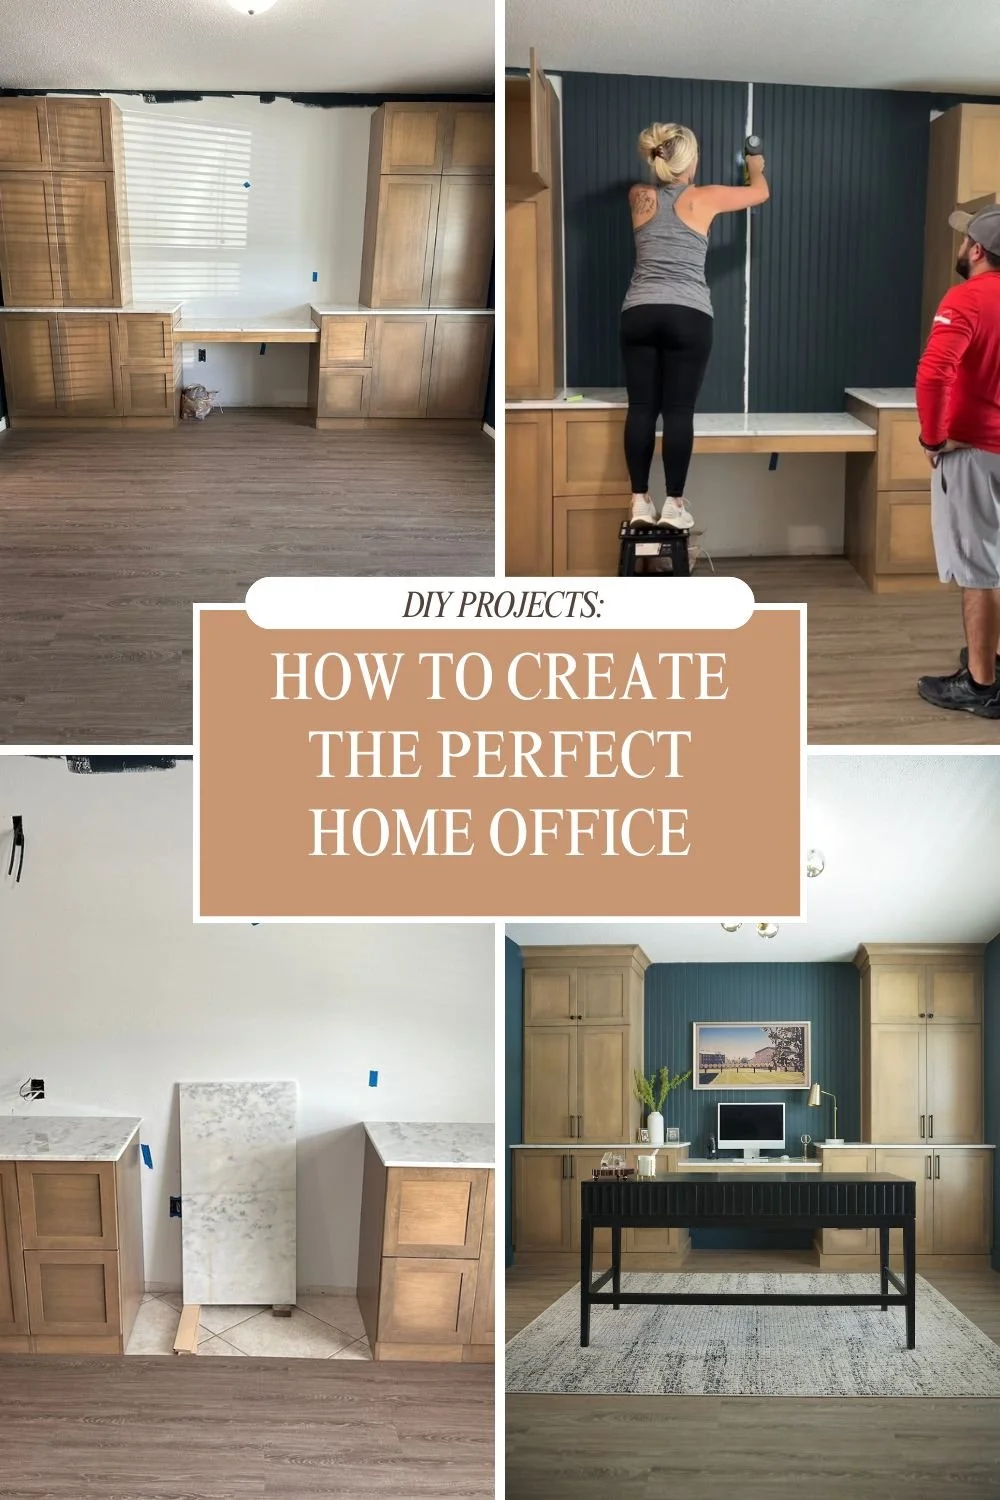
Here is what it looked like before…

The first thing we did was remove the wall of mirrors. I’m not going to lie, this scared me. These were 8ft tall, heavy mirrors and I really thought they would come crashing down on us. It ended up not being as bad as I had imagined (see the mirror removal video here) and we were totally surprised to find a wallpaper mural behind the mirrors.


After we removed the old wallpaper, the next step was installing the LVP flooring that is throughout our entire home. If you’ve followed me on Instagram then you know that we have installed this flooring over top of our tile floors throughout our entire home, one room at a time. See my blog post here about it: Laying LVP Over Tile Floors.
Next up was painting the walls and I decided to go with a deep blue color called Mount Etna by Sherwin Williams in a matte finish. I made a full, detailed video on how to paint a room for beginners that you can watch here.


Then it was time to start installing the cabinets. We ordered custom cabinets from a local cabinet company in our town and chose to install them ourselves. The brand of cabinet is called Tedd Wood and we went with their ‘Gettysburg’ cabinet doors which are a shaker style door. The color of the cabinet is ‘Wheat’ stain on Maple.
Once we got the lower cabinets installed, I visited a few local stone yards looking for counter tops and was shocked at how expensive they were for what I thought was a small surface area. The stone companies kept telling me that I had to pay for a full slab even though I would only be using 50%-60% of the slab.
So I started looking for stone yards that offered ‘remnant’ pieces to see if I could find enough for our project. I wasn’t able to find remnant pieces but I did find a local place that had a full slab of marble leftover from a commercial job and the price was marked down by 50%! It was gorgeous and I couldn’t buy it fast enough!

With the counter top installed, we were then able to install the upper cabinets. The wall where we had removed the mirrors and wallpaper was still pretty damaged so I decided to install bead board paneling on this wall. It covered the drywall damage and also added a fun texture to the room that I really loved. Checkout my detailed tutorial on how to install bead board panels here.


Finally we were on to the smaller details. We installed all the finishing trim pieces to the cabinets and installed the new baseboards in the room. We put in our electrical outlets which we had pre-planned the locations for prior to installing the cabinets. The outdated ceiling light was removed and we installed a new modern light fixture.
I found a rug I really loved that had a dark navy-gray color in it that played perfectly with the wall color.
We also decided to add a 43” Frame TV onto the beadboard wall. We’ve had a Frame TV in our living room for a couple years and absolutely love how we can put the TV into ‘Art Mode’ and display any kind of art making the TV appear as an actual framed piece of art on the wall.
But for more functional purposes, the TV will be used in the office to mirror our devices onto, use as a larger computer monitor and to watch TV while we work. Last, I added a brass desk lamp that has a marble base that matches our counter tops, a faux-leather desk chair, and a vase with some greenery. See all the small details and decor here.

The two hardest decisions I had to make during this project were picking out a desk and deciding between black or gold hardware for the cabinets. I looked at probably 1,000 desks online (no joke) and came close to buying a handful over the two months it took us to work on this office.
I ultimately decided to go with a black wood desk that had scalloping detail along the front and on the drawers which just happened to be half the price as the other desks I had considered. For the cabinet hardware color, I equally loved both the black and gold hardware but ended up going with the black (for now). I kept the gold hardware so I can always swap them out in the future if I change my mind.


With the office completed, it really does feel like we gained extra square footage in this house. Before, the room was a catch-all space where I threw empty Amazon boxes and project supplies. Now it is a true home office where I spend a large majority of my time and I couldn’t be happier with how it came out!


HEY THERE, I’M ASHLEY!
Here to inspire beginner DIYers!